Drafts around an exterior door can make a comfortable room feel colder or hotter than the thermostat suggests. Door weather stripping closes those moving gaps without preventing normal door operation. The right seal can also limit dust, moisture, insects, and unwanted outdoor air.
The U.S. Department of Energy recommends weatherstripping for movable components such as doors and operable windows. Air sealing can improve comfort while reducing heating and cooling demand. The key is matching the seal to the gap instead of buying by price alone.
Quick answer: Weatherstripping seals gaps along a door’s top and sides, while a sweep or door bottom seals the threshold area. Choose the profile by gap size and frame design, remove damaged material, clean the surface, install the replacement without stretching it, then confirm the door closes smoothly with light compression.
| Key question | Practical answer |
|---|---|
| Best general option | Compression bulb or kerf-in seals suit many exterior entry doors |
| Best for small gaps | V-strip or thin adhesive foam |
| Best for the bottom | Door sweep, door shoe, or compatible threshold seal |
| Common DIY time | Many straightforward replacements take under two hours |
| Typical professional cost | Current U.S. estimates vary widely by door and installation scope |
| Main warning signs | Drafts, visible light, cracking, flattening, loose sections, or difficult closing |
| Most important buying detail | Match the replacement profile to the frame and measured gap |
Key Takeaways
- Identify the existing seal profile before removing or buying anything.
- Measure the gap with the door closed, because compression determines whether the replacement works.
- Use perimeter gaskets around the jamb and a separate sweep or door bottom below.
- Fix loose hinges or alignment problems before trying to hide them with thicker material.
- Choose moisture-resistant products for exposed exterior entrances.
- Test the finished seal at several points instead of checking only the latch side.
What Does Door Weather Stripping Do?
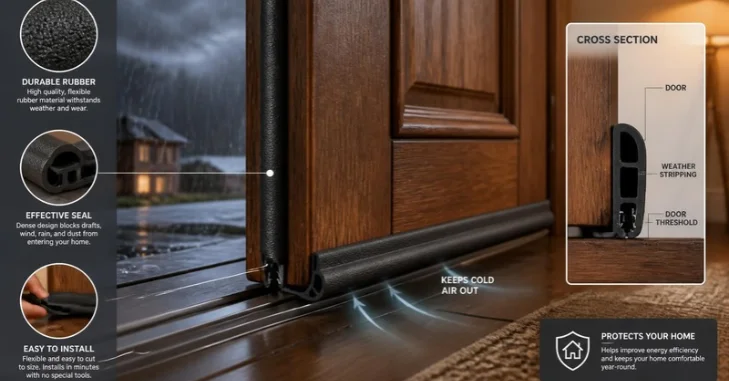
A door weather stripping perimeter seal fills the small space between the movable door slab and stationary frame. That reduces uncontrolled air exchange when the door is closed. It can also reduce the paths available to dust, insects, rain, and outside noise.
Weatherstripping differs from caulk because the two products serve different joints. Caulk usually seals stationary cracks between building materials. Flexible strips handle areas where the door must continue opening and closing.
The Department of Energy identifies caulking and weatherstripping as basic air-sealing methods. Its guidance says reducing drafts can improve comfort and lower heating or cooling demand. For broader exterior air and water control, Renovixa’s house wrap guide explains how openings interrupt the building envelope.
Types of Door Weather Stripping and Where Each Works Best
Choosing by material alone can lead to a poor fit. Gap width, jamb design, exposure, and door movement matter more than brand names. The table below compares common residential options.
| Type | Best use | Main advantage | Main limitation |
|---|---|---|---|
| Kerf-in bulb seal | Modern exterior door jambs with grooves | Durable compression and clean appearance | Requires a compatible kerf groove |
| Adhesive foam tape | Small, even gaps and temporary repairs | Cheap and easy to install | Can flatten or loosen sooner |
| V-strip tension seal | Narrow gaps along jambs | Thin and discreet | Installation requires accurate placement |
| Tubular rubber or silicone | Exterior doors with variable gaps | Flexible and resilient | Can make closing harder if oversized |
| Felt | Low-use or temporary applications | Low cost | Poor choice for wet, exposed locations |
| Door sweep | Bottom edge of a swinging door | Blocks floor-level drafts | Wears from repeated contact |
| Door shoe | Exterior door bottom | Wraps the lower edge securely | More involved installation |
| Threshold seal | Gap between door and sill | Helps close uneven lower gaps | Must not create a trip or closing problem |
Kerf-in compression seals are common on newer steel and fiberglass entry systems. A barbed edge presses into a narrow groove around the jamb. The flexible bulb then compresses against the closed door.
Adhesive foam works better when the surface is flat and clean. It can solve small, regular gaps without drilling or special tools. It is less suitable where rain, heavy use, or strong temperature swings punish the adhesive.
V-strip uses tension rather than thick compression. The folded material springs outward and contacts the moving surface. It works well where a bulky gasket would interfere with closing.
How to Choose the Right Seal for Your Door
Start by opening the door and examining what is already installed. A narrow groove usually indicates a kerf-style replacement. Flat surfaces with adhesive residue often point to foam or another surface-mounted seal.
Next, close the door and inspect the gap around all four edges. Look for daylight, uneven spacing, or sections where the existing gasket no longer touches. Check the hinge side carefully because a loose hinge can create a false sealing problem.
Do not automatically install the thickest product you can find. Excessive compression can make the latch difficult to engage. It may also place unnecessary pressure on hinges and hardware.
Climate should also affect your choice. Exterior entrances in wet or humid regions benefit from water-resistant rubber, vinyl, silicone, or EPDM-style materials. Homeowners addressing wider moisture problems can also review Renovixa’s moisture barrier guide before treating every damp area as a simple door-seal issue.
How to Install Door Weather Stripping Step by Step
Most homeowners can replace a straightforward perimeter seal with basic hand tools. Wear eye protection when removing fasteners or cutting rigid carriers. Follow the replacement manufacturer’s instructions when they differ from general steps.
What You’ll Need
- Tape measure
- Utility knife or scissors
- Pliers or flat screwdriver
- Cleaning cloth
- Mild cleaner suitable for the frame finish
- Replacement perimeter seal
- Compatible door sweep if the bottom also leaks
- Pencil
- Drill or screwdriver for mechanically fastened products
1. Inspect the Door Before Removing Anything
Open and close the door several times before starting. Check for sagging, rubbing, loose hinge screws, or a latch that no longer aligns. Weatherstripping cannot correct a door that has moved significantly out of square.
Repeated sticking across several openings can sometimes indicate a broader structural issue. Renovixa’s concrete foundation repair guide explains why changing door alignment can matter when other movement signs appear. Treat the cause before installing a thicker gasket.
2. Remove the Old Seal Carefully
Pull kerf-in material straight from its groove, starting at one end. Use pliers gently if the spline is difficult to grip. Avoid damaging the groove because the replacement needs it for support.
Peel adhesive-backed strips slowly instead of tearing them away in pieces. Remove leftover adhesive according to the surface manufacturer’s recommendations. The new strip needs a clean, dry base.
3. Measure Each Side Separately
Measure the head jamb and both vertical jambs rather than assuming they match. Older frames may be slightly irregular. Record each dimension before cutting.
For surface-mounted products, confirm the available mounting width too. A correct length will not help if the backing overlaps trim or hardware. Renovixa’s window trim styles guide provides useful context about trim around openings and draft control.
4. Cut and Install the Perimeter Seal
Cut the top section first and test the fit before securing it. Install the side pieces so their ends meet the upper seal without leaving open corners. Do not stretch flexible material while fitting it.
Kerf-in products should seat fully in the groove. Adhesive products need firm, even pressure against a clean surface. Mechanically fastened carriers should remain straight so the gasket compresses consistently.
5. Seal the Bottom of the Door
Inspect the sweep, shoe, and threshold separately from the jamb seals. The lower edge faces abrasion, dirt, water, and repeated movement. Replace damaged components with parts designed for the door style.
Adjust the sweep so it contacts the threshold without dragging excessively. Heavy friction makes the door unpleasant to use. It can also wear the new component quickly.
6. Close the Door and Test the Seal
Close and latch the door normally after installation. Check for light, drafts, or areas with little gasket contact. A sheet of paper can help compare compression at several positions.
The paper should meet noticeable resistance without becoming trapped. Open and close the door again after every adjustment. The Department of Energy’s exterior-door guidance emphasizes reducing infiltration without impairing normal operation.
Common Installation Mistakes to Avoid
Installing a thicker gasket over an alignment problem is one of the most common mistakes. It may stop one draft while creating another. Check hinges, strike alignment, and frame condition first.
Another mistake is stretching flexible material during installation. The strip can shrink toward its original length later. That leaves gaps at corners where air can pass.
Poor surface preparation also causes early failure. Dust, oil, old adhesive, and moisture weaken pressure-sensitive backing. Clean and dry the mounting area before removing the protective liner.
Finally, do not ignore the threshold because the top and sides look sealed. The bottom often has the largest visible gap. Treat it as a separate sealing component.
What Does Weatherstripping Cost in the United States?
Material-only DIY repairs can be inexpensive, especially for foam, V-strip, and simple replacement gaskets. Professional installation costs vary much more because labor minimums, door condition, hardware, and regional pricing differ. Current 2026 consumer estimates show substantial variation between simple sealing and full installed service.
Homewyse currently estimates professional installation beginning around $117 to $307 per door under its stated assumptions. Angi reports broader project pricing that can reach several hundred dollars. These figures are planning references rather than guaranteed local prices.
Get an itemized estimate if the work involves a damaged threshold, rotten trim, door adjustment, or water intrusion. Those conditions turn a small sealing job into a larger repair. Compare the scope of work before comparing only the final number.
When Should You Replace the Seal?
Visible cracking, brittleness, flattening, tearing, or loose sections are clear replacement signs. Daylight around a closed exterior door is another strong clue. Recurring drafts often confirm the seal no longer makes consistent contact.
Check the gasket if indoor comfort suddenly changes near an entrance. Dirt or insects appearing along the edges can provide another clue. Water marks require closer inspection because flashing or drainage problems may also be involved.
A replacement schedule should depend on condition rather than a fixed calendar. Sun exposure, climate, material quality, and daily use change service life. Inspect exterior doors during seasonal home-maintenance checks and replace failed sections when necessary.
When Weatherstripping Will Not Fix the Problem
A new seal cannot straighten a warped door or repair rotted framing. It also cannot correct severe hinge sag or a shifted jamb. Those problems need mechanical or carpentry repairs first.
Water entering above the door may come from failed flashing rather than the perimeter gasket. Moisture inside surrounding walls can have another source entirely. Diagnose where water begins before adding more sealing material.
You should also consider professional evaluation when the door suddenly becomes misaligned. This matters more when cracks, sloped floors, or other openings change at the same time. A simple draft repair should not hide signs of larger movement.
Make the Door Seal Before Replacing the Door
A drafty entrance does not automatically need a new door. Start with the hinges, alignment, jamb gasket, sweep, and threshold. Those checks can identify small problems before they become larger repairs.
Choose replacement material by profile and measured gap rather than appearance alone. Install it without stretching and confirm even compression afterward. A properly fitted seal should improve comfort while allowing the door to open, close, and latch normally.
Door Weather Stripping FAQ
What type of door weather stripping should I use?
Use the profile that matches the frame and gap. Kerf-in bulbs work well with compatible grooved jambs, while V-strip suits narrow gaps. Adhesive foam can handle simple, small gaps where exposure is limited.
How do I know whether my door needs a new seal?
Look for cracks, flattened material, daylight, drafts, loose adhesive, or missing pieces. Test several points around the closed door because failure may be localized. A seal that no longer compresses against the slab should usually be replaced.
Can weatherstripping make a door hard to close?
Yes, an oversized gasket can create too much compression. Misaligned installation can cause the same problem. The finished door should latch normally without needing excessive force.
Should I weatherstrip the bottom of a door?
Yes, but use a sweep, shoe, or threshold component designed for the lower edge. Perimeter jamb material is usually not appropriate at the floor. Adjust the bottom seal so it blocks drafts without dragging heavily.
Is caulk the same as weatherstripping?
No, because they normally seal different types of joints. Caulk is suited to stationary gaps around fixed materials. Flexible strips are designed for joints that move whenever the door operates.
Can weatherstripping help lower energy use?
Reducing air leakage can reduce unnecessary heating and cooling demand. The Department of Energy includes sealing doors and windows among common home-efficiency measures. Your actual savings depend on climate, existing leakage, HVAC efficiency, and other building conditions.